Category Archives: Recipes

In case you want to know how to make something I’ve made (because sometimes the food I make is actually edible)

Better for You: MYO Sports Drink

The other day (which – let’s be honest – actually means a few weeks or months ago) I finished up an outdoor workout. When I returned home, I drank about half of a sports drink to replenish myself. It was quite tasty and refreshing, exactly what I’d been hoping for.

As I sat there, I found myself thinking back to some of the out-of-the-box recipes I’d tried to make over the years: raw apple pie, raw brownies, raw lasagna, lemon cauliflower pudding, and so on and so forth. And it hit me: Why not try to make my own sports drink, one with minimal added sugar and no extra gunk? Was that even a thing? Immediately I did an online search for “homemade sports drink” and got a few solid options.

But then life happened, and my inspiration to make a sports drink was placed on a back burner for a while. It would cross my mind every now and then, but that was about it.

A few days ago (literally meaning “a few days ago” this time, haha), I had a long conversation with a friend, during which we talked a lot about changes we’re making to improve our health. She and I are both pretty active, so I brought up the MYO sports drink idea. Just talking about it renewed my interest, and she was intrigued as well.

So I revisited that idea and researched recipes again. There were a few options that called for fruit juice (as in, premade); while they specified that it should be 100% fruit juice, I wanted something a bit more natural. I finally stumbled across a simple recipe on a site called The Honour System that was almost exactly what I was looking for: citrus fruits, minimal sugar, salt, and water. Bingo.

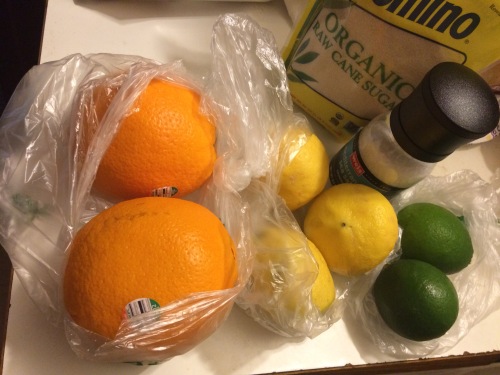
One short visit to the store later and I was all set to make two flavors of the sports drink: lemon-lime and orange.

Ingredients:
-1/4 cup freshly squeezed lime juice (this worked out to one and a half limes for me, although I know it varies) for the lemon-lime flavor OR 1/2 cup freshly squeezed orange juice (one orange for me) for the orange flavor
The remainder of the ingredients are the same for each flavor:
-1/4 cup freshly squeezed lemon juice (about one lemon for me)
-2 cups fresh water
-1/8 tablespoon sea salt
-2 tablespoons organic cane sugar

FD2EEAB3-F797-4CCF-9D72-FDF2D9E0F9A8

The Process:
-Combine all ingredients in a resealable jar/beverage container and shake together.
-Can be stored in the fridge for up to a week.
-That’s it!

B8526331-3249-4137-AFB4-40573041D10D

Rolling the lemon around

85772387-7BDE-4026-859A-4E706DD26C55

Look! It’s a lime!

D9E0E110-9B80-4A55-98B1-396716751D71

In goes the orange juice…

EC62C13B-3B39-49FF-8325-595BDFC756C7

Just a little bit of sugar…

03A94B38-B7D9-4A60-8810-85D071CCAA8B

Salt into the orange drink…

E9633F7F-D4FB-4311-AB73-FDC523BEE962

And some salt into the lemon-lime

The recipe says it’ll take 15 minutes to make, but it took me longer than that because I am an absolute SLOTH in the kitchen.

But the wait was worth it.

463F9AD1-AC51-4CDF-B98A-218937B59212

Shake it up!

After giving it a good shake, I tried the lemon-lime first. When I unscrewed the lid and took a sniff, the smell was so acidic that I honestly felt like I was going to be drinking straight-up lemon juice. But no – it was absolutely delicious. Tart, yes, but very, very good. I was absolutely wowed.

71F4B183-7A10-4F4C-9FB2-2EA21BED94DC

YUM.

I then tried the orange, and that one blew me away as well! SO GOOD. I’d left a few small chunks of pulp in this one on purpose, and that was a good call in my opinion. Also would have been totally fine without, but if you like pulp/texture, keep that in mind.

80A5C947-1AA1-41F2-924A-EC300798DEF2

DELICIOUS. (Ignore the bottle…)

Now, for a few takeaways:
-Make sure you have appropriate (resealable) jars/containers to hold these drinks, assuming you’re not consuming them right away. I didn’t have enough appropriate containers, so I initially mixed the orange one in a large-ish cup. Only afterward did I remember I had an empty (large) plastic water bottle, so I transferred the orange drink over after I had mixed it all together. The mastermind behind The Honour System site ended up purchasing mason jars for these sports drinks, and that’s not a bad idea for anyone who’s going to be making them regularly.

-Also might be worth buying an inexpensive citrus squeezer/juicer to expedite the process, says the kitchen sloth (yours truly).

-I’m interested in trying this with coconut water replacing some or all of the regular water. I’m not a fan of coconut water, so I don’t know how this will go, but I know that coconut water is chock full of electrolytes and other good stuff. If you try it that way, give me a shout and let me know how it went!

The verdict overall? 10/10 would make again. Also, I can’t wait to do a few difficult workouts so I can replenish myself with these drinks afterward.

B1AA74D9-5498-424D-A6AA-F8B6FD0EDE3E

Success.

Ten Years of Operation Life

Ten years ago today, on April 26, 2010, I took the first steps on a journey – a journey toward improved health, improved energy levels, better fitness, and a whole host of other benefits that I hadn’t anticipated. This journey is called Operation Life.

The first stirrings of Operation Life can actually be traced to a few weeks before, on April 5, 2010, when I realized I wasn’t as healthy as I thought I was. I had found myself in a bit of a rut since graduating from college the year before, and I was becoming increasingly dissatisfied with certain aspects of life. That led to me being grouchy, perpetually tired, and generally lethargic – and I kind of tried to self-medicate with food. It didn’t work, and, in fact, it likely made things worse, contributing to my downward spiral.

But on April 5, the rubber hit the road and I realized I needed to change something about the way I was living. My family was planning an incredible trip to South Dakota that summer, and I knew I wanted to get in great shape so I could make the most of the experience – lots of hiking, climbing, exploring, you name it.

Three weeks later, I started taking tangible steps toward this goal as part of an effort dubbed Operation South Dakota. My mom decided to join me, and it was so helpful to have accountability. I started eating more fruits and veggies. I walked past the bags of chips on top of the fridge when I got home from work. I exercised more regularly and more intentionally. My first official workout to prepare for the South Dakota trip was a weightlifting session using dumbbells I already owned. I don’t remember what the routine was, but it was probably something weird I created on my own with no idea what I was doing (sorry, Dad).

As time progressed and the trip grew closer, I was loving how much better I felt – stronger, more rested, happier, more fit. Mom and I decided that Operation South Dakota should be renamed Operation Life, because we were not going to stop our efforts or scale them back once the trip was behind us. No, our new way of approaching life was going to stick with us.

104_7861

The sis and yours truly exploring the Badlands

104_8108

Family hike near Sylvan Lake

And it did. I loved working out and eating in ways that fueled my body to be its best.

As I ramped up my veggie intake, I expanded my horizons by discovering a world of strange but healthy recipes.

Some of them were surprisingly good. Take raw lasagna, for example. Completely vegan, right down to the “ricotta cheese” that was actually made from macadamia nuts and pine nuts. It was very tasty, but I only made it once because it was EXPENSIVE. Another surprise was a kale juice recipe; sounds gross but ended up being very tasty!

Then there were the recipes that were expectedly good: smoothies and three-ingredient cookies, for example. I haven’t made those cookies in a while. Maybe I will soon – perhaps today?

8-Mmmmm

Tasty three-ingredient cookies!

And, of course, there were a few duds. Mom and I tried a recipe for “Sweet and Spicy Arugula Saute” that left our eyes watering. But my least-favorite was a dairy-free lemon cauliflower pudding. It was the most horrible thing, and I still laugh when I recall naive Krista thinking that this would somehow be good!

Outside of the kitchen, I focused on my fitness. I’m a firm believer that exercise shouldn’t be something you strongly dislike. If running isn’t your thing, for example, don’t make yourself run. Instead, do something you enjoy. And I can honestly say that I enjoyed my workouts, everything from lifting weights to riding the exercise bike to shooting baskets and incorporating some sprinting games.

Mom and I also did a lot of walking. We’d walk 2 miles from home to Lancaster Central Market, buy a bunch of produce, and carry it all home. Yes, sometimes this meant that we each were toting a melon of some sort. It was all just fun.

I didn’t set out to be a runner.

This goes back to my philosophy that people should enjoy exercise. And I did not enjoy running. At all. Whenever I saw a friend running at college, I’d be like, “Why?!” After college I watched a friend finish a half marathon and sincerely wondered what in the world would ever possess anyone to run that far. So I was strongly anti-running.

But after consistently taking walks for months, I started to think, What if I move faster? And after doing my sprinting games during my basketball workouts, I began to wonder, How many laps around this court is a mile? The answer was 20 – well, 20 laps was 1.1 miles. Before I knew it, I was starting each basketball session with 20 laps and then moving on to my regular workout. I timed myself, watching myself complete 1.1 miles in 12 minutes, then 11, then 10, then 9-something. EXCITING!

I also started running with friends here and there. I woke up early to run at the beach on vacation. Mom and I signed up for our first 5K (Sept. 17, 2011), and I won third in my age category. Inspired, I kept signing up for 5Ks.

691_0308

First 5K!

After a few months of that, my friend Candace asked me if I’d be interested in running the 2012 Pittsburgh Half Marathon with her. In my head, I immediately thought, NO WAY! But then I thought about it a little more and was like, “Hey, why not?”

In a very short amount of time, I went from being appalled that anyone would want to run 13.1 miles to realizing why they do. After the Pittsburgh Half, I was hooked.

693_0891aa

I blame Candace for getting me hooked on half marathons. Yes, definitely Candace’s fault.

I ran four half marathons before I decided to tackle an even bigger challenge, one I had promised myself I’d never do: a full marathon. (Haha, I accidentally typed “fun” instead of “full” just now. And “fun” it was NOT!) My first marathon was in 2015, and it was without a doubt the toughest thing I’ve ever done. It didn’t go as planned, but I learned a lot and returned the following year to try again, with more success.

Pittsburgh Marathon walking vs jogging

2015 (left), where I walked a lot, vs. 2016 (right), where I ran the whole thing!

I’ve even completed a handful of obstacle races, from national ones like Warrior Dash (may it rest in peace) to local ones like the Acre Breaker. Now those actually are fun. Not fun to clean up after, but hey, cross that bridge when you come to it.

IMG_0494a (33d) Official 5a Warrior Roast cropped

Summoning my inner Air Jordan, 2014

IMG_0498

I love this shot of my sis and me at our first Warrior Dash! (This was the coldest late-August day EVER, I’m pretty sure.)

And, of course, there’s hiking. I’ve been on many backpacking and camping trips. I’ve hiked Pikes Peak. I’ve summited Mount Washington (twice), along with numerous other peaks in New Hampshire and the Adirondacks, as part of yearly winter mountaineering adventures. I never would have dreamed of doing these things, but the path of Operation Life led me to a place where they were and are possible.

IMG_1127 cropped

Mountaineering crew on Franconia Ridge (I’m on the far right in the green jacket)

Ten years after Operation Life began, it’s fun to look back at it all. This is such a far cry from where the journey started! From sporadic weightlifting, basketball, and walking to half marathons, marathons, obstacle races, and mountaineering?!

All this reminiscing has challenged me too, because I’ve noticed myself coming full circle lately…and not necessarily in a good way. You see, I’m not as healthy or fit as I’d like to be at the moment. I’ve slipped into some not-so-great food habits, due to convenience or general disappointment with things, and I need to snap out of it! I’ve also scaled back on my exercise because I sometimes feel (or think I feel) too tired at the end of the workday. Sound familiar? Sounds like me a decade ago!

What better time to start getting back on track with renewed focus and intention than on the 10-year anniversary of the launch of Operation Life? Let’s do this.

I had no idea where Operation Life would take me, but I’m so grateful for this journey. And I’m so grateful for wherever it leads me next.

IMG_8773

Fun With Kale: Juice Extractor Edition

“Hey, do you want to make kale juice?”

The question came from my mom, who had apparently stumbled upon a juicing recipe that sounded appetizing to her.

As the idea hung in the air for a few seconds, I envisioned myself slurping straight kale juice from a straw in all its vegetably glory. Blech. Don’t get me wrong: I love kale, but I love it as something I have to chew and not as something in liquid form. Still, before I even looked at the recipe, I decided I’d try it. When it comes to food (especially healthy recipes), I’ll try almost anything once.

It turned out that the recipe for kale juice did not look nearly as intimidatingly kale-ish as I’d imagined. The concoction, which came from Giada De Laurentiis and can be found in a recent issue of Food Network Magazine, called for 1.5 pounds of kale, two medium apples (like Fuji or Honeycrisp, halved and cored), two medium carrots (scrubbed), and one small lemon (peeled). Not bad.

Some quick nutritional info:
-Kale is known as a superfood: It’s high in fiber (digestion assistance), iron (oxygen transportation, liver function, etc.), copper (heart rhythm, red blood cell formation, utilization of iron, etc.), calcium (bone strength, etc.), antioxidants (cancer prevention), Vitamin A (cancer prevention and improvement of vision and skin quality), Vitamin C (an immune system strengthener), and Vitamin K (cancer prevention, blood clot prevention, bone health).
-Regular apple consumption can help with bone strength, lower the risk of asthma, lower LDL (bad) cholesterol, and help to prevent diseases like Alzheimer’s and many types of cancer.
-Carrot consumption has been shown to improve vision and skin quality and to prevent heart disease, cancer, and tooth damage.
-Lemons are high in Vitamin C, as well as in potassium and calcium (which keep hearts and bones healthy).

I could, of course, go on and on singing the nutrition-related praises of these four ingredients, but you get the idea.

So I whipped out my handy-dandy juice extractor, and Mom and I got to work making half of the recipe.

Ready to go!

Ready to go!

Prepping the kale

Prepping the kale

Slicing the apple (I used Opal because there was one on hand and because I think Opals have a nice balance of tartness and sweetness.)

Slicing the apple (I used Opal because there was one on hand and because I think Opals have a nice balance of tartness and sweetness.)

Peeling the lemon

Peeling the lemon

We only had baby carrots, so we estimated how many baby carrots would be equal to a medium-sized carrot.

A selection of the ingredients we used

A selection of the ingredients we used

One little word of advice: When you’re prepping the fruits and veggies for the juicer, make sure the pieces are small enough to fit into the chute. It’s not a huge deal if they’re too big because you can always cut them down more while you’re juicing, but it’s just easier if you don’t have to stop in the middle of the juicing process.

When our ingredients were ready, we fed them into the juicer and watched the magic happen before our very eyes.

That's my "I'm concentrating on feeding apples and kale into the chute" face.

That’s my “I’m concentrating on feeding apples and kale into the chute” face.

Ciao, kale!

Ciao, kale!

Check out the colors!

Check out the colors!

Mom adding some ingredients to the juicer

Mom adding some ingredients to the juicer

Beautiful kale color!

Beautiful kale color!

Don't you want to guzzle that down?

Don’t you want to guzzle that down?

Adding the last of the goods

Adding the last of the goods

After the juice extractor was done doing its thing, it was time for Mom and me to try it out. Even though I wasn’t sure if I’d like the juice, I wasn’t too nervous anymore; I mean, it’s difficult for me to feel scared to try something that I know is ridiculously good for me.

That is pure health.

That is pure health.

What's up, kale juice?

What’s up, kale juice?

This was absolutely nothing like the vegetably horror I feared when I first heard the term “kale juice.” It was tasty, for sure! Plus, it had a nice sweetness to it, but it wasn’t overwhelmingly sweet. Good stuff! (Side note: I saved the pulp from the juicer, and I’m planning to use it to make something tasty like bread. Stay tuned!)

Verdict: I’d definitely make that again. Next time, though, I’ll make the full recipe! Thank you, Giada!

Cheers!

Cheers!

Apricots: Transformed and Still Delicious

I love dates.

No, not that kind of dates.

I mean the food!

Ever since I used them to make raw Sea Salt Caramel Bars – which were delicious, by the way – I’ve been interested in using them in other recipes to add both texture and a natural sweetness.

So when my dad showed me a recipe he’d gotten from a co-worker for natural/healthy/paleo-friendly dried apricot bars that utilized dates, I knew I had to try it. Side note: I don’t actually know if these bars have an official name; we’ve referred to them as “those bar things,” “paleo fruit bars,” “apricot bars,” and pretty much any other name in that neighborhood.

If you can't read this, it's OK; I'll walk you through it! All you have to do is keep reading.

If you can’t read this, it’s OK; I’ll walk you through it! All you have to do is keep reading.

Dad and I decided to make a fun father/daughter memory out of the experience by making the bars together. We gathered the ingredients: 1/2 cup of raw almonds, 1 cup of raw pecans, 1/4 tsp of salt, 12 pitted dates, and 1 cup of dried, and preferably unsweetened, apricots (we used lightly sweetened dried apricots, though, because we couldn’t find unsweetened ones). I’m going to inch my way onto a culinary limb and say that of course other types of dried fruit could also be used.

The ingredients, plus a rolling pin (which is optional)

The ingredients, plus a rolling pin (which is optional)

First off, we measured the almonds, pecans, and salt, and dumped them into the food processor.

Hello, pecans!

Hello, pecans!

Allow me to present the almonds.

Allow me to present the almonds.

Dad taking charge of the salt measurement

Dad taking charge of the salt measurement

Ready to hit the food processor

Ready to hit the food processor

Next, we used the food processor to grind the almonds, pecans, and salt until the mixture was mealy.

Mixin' it up!

Mixin’ it up!

Not quite mealy enough yet...

Not quite mealy enough yet…

Once the food processor had done its thing, we dumped the mixture into a bowl…

Mmmm.

Mmmm.

…in order to free up the food processor for the dates and apricots.

There go the dates!

There go the dates!

Getting the appropriate apricot measurement

Getting the appropriate apricot measurement

Here's the "before" version.

Here’s the “before” version.

We ran the food processor until the date/apricot mixture was like paste.

Letting the food processor paste-ify the dates and apricots

Letting the food processor paste-ify the dates and apricots

See? Paste. Perfect.

See? Paste. Perfect.

Then, as I was scooping the date/apricot paste out of the food processor, Dad had a fake accident with the rolling pin:

Careful there, Dad! Haha.

Careful there, Dad! Haha.

Once Dad had recovered, we mixed the paste with the pecan/almond/salt concoction and kneaded it all together.

Not completely mixed yet

Not completely mixed yet

Gettin' my hands dirty

Gettin’ my hands dirty

Now it's all ready for the next step.

Now it’s all ready for the next step.

The mixture was ready for its close-up.

The mixture was ready for its close-up.

But who wants to take a bite of a large ball of apricot-ness? Well, I did, but that’s beside the point. What we actually did was roll the mixture out on a piece of parchment paper using a rolling pin. It doesn’t really matter how thick or thin the bars are, but we wanted ours on the thinner side of things.

Get ready to watch the transformation:

Going...

The…

...going...

…transformation…

...going...

…is…

...gone!

…complete!

Unrecognizable! Ha.

As the finale, we cut up the bars and enjoyed.

Slicing up the apricot bars

Slicing up the apricot bars

Dad and I preparing to try the bars

Dad and I were ready to try the bars.

Here goes nothin'!

Here goes nothin’!

The verdict? Incredible! They stay together pretty well, they’re moist, and, best of all, they’re not too sweet. Delicious!

We cut up the rest of the bars, put them in a container lined with parchment paper, and popped the container in the fridge to keep the bars safe for future snacking.

One batch made three layers like this.

One batch made three layers like this.

The only thing left to do was celebrate a successful daddy/daughter experiment. Yeah!

Success!

Success!

Adventures in Making a Dairy-Free Pudding

I love weird recipes. You know, ones that call for uncommon uses of food items, like concocting a raw, vegan “ricotta cheese” out of macadamia nuts and pine nuts, for example (maybe I’ll blog about that one sometime).

So when I stumbled upon a recipe for dairy-free lemon pudding with a unique thickening ingredient as its base (I’ll reveal its identity later), I was pretty excited…and also a little nervous because it sounded SO bizarre. Since I’ve been on a serious lemon kick lately, I figured I’d give it a try. I found the recipe at www.skinnytaste.com, which has a good track record, since that’s the source of the recipe for the three-ingredient cookies I blogged about a while ago.

Besides, the pudding didn’t look THAT expensive to make; I can’t make that claim about my “ricotta cheese” mixture. The pudding only required one cup of unsweetened almond milk (or other dairy-free milk), two tablespoons of sugar, two teaspoons of pure vanilla extract, zest from one large lemon, 1/4 cup of freshly squeezed lemon juice, and three cups (350 grams) of the mystery thickening ingredient: cauliflower.

Nope, that’s not a typo.

Everything you need to make dairy-free lemon pudding

Everything you need to make dairy-free lemon pudding

With all ingredients rounded up, I got to work. I added to a saucepan the almond milk, sugar, vanilla extract, lemon zest, and the cauliflower (which needed to be roughly chopped and which measured three cups). Because the recipe said “three cups (350 grams),” I figured the weight of my three cups of cauliflower was close enough, so I didn’t bother to weigh it.

Roughly chopped cauliflower

Roughly chopped cauliflower

Adding the almond milk

Adding the almond milk

Looks interesting, doesn't it?

Looks interesting, doesn’t it?

In goes the lemon zest

In goes the lemon zest

I brought it to a boil at medium-high heat. Once it was bubbling away, I let it simmer uncovered for seven or so minutes to make sure the cauliflower was nice and tender (the recipe lists five to seven minutes as the target).

Excited - and nervous - about the pudding attempt

Excited – and nervous – about the pudding attempt

Then I removed the mixture from the stove and prepared my food processor for the next part: blending it all together. I added the freshly squeezed lemon juice to the saucepan; conveniently, I had just enough juice from the zested lemon.

Getting the lemon juice ready

Getting the lemon juice ready

I dumped all the contents into the food processor. The website recommends using a high-powered blender such as Vitamix, but a regular food processor worked fine for me and gave the mixture a nice consistency.

Taking the next step to becoming a pudding

Taking the next step to becoming a pudding

According to the recipe, the mixture needs to be blended for at least a minute, but I let it go longer than that to make sure the consistency wasn’t too grainy. When I was satisfied with it, I poured it into a bowl and popped it in the fridge for 18 hours, as the recipe suggested, to allow the dominant lemon flavors to mellow out.

There's nothing like a food processor!

There’s nothing like a food processor!

Problem: The recipe claimed that there would be no obvious evidence of cauliflower, but when I poured the mixture from the food processor into the bowl for refrigeration, I caught an overwhelming whiff of the vegetable. Plus, the pudding looked like pea soup.

Does this look lemony to you?

Does this look lemony to you?

OK, let’s fast-forward 18+ hours to when I pulled the concoction out of the fridge. Of all the weird recipes I’ve tried to make, I was most nervous about trying this one.

Hello, nerves!

Hello, nerves!

And then I took a bite.

And it was absolutely foul.

I steadied myself and went back for a second bite, thinking that my taste buds had been somewhat mistaken. How wrong I was. It tasted like acid cauliflower. Still, I was (eventually) able to choke down the rest of my helping of pudding (that’s called a miracle, folks).

I don’t know where I went wrong! I’m sure that this less-than-pleasant flavor combination was due to something I didn’t execute properly. If the recipe author’s version had turned out like mine did, there is absolutely no way she would have posted it, so I know for a fact that something went awry in my procedure. If I had to guess, I would say it had to do with the amount of cauliflower. Looking back, I should have measured it. I read recently that three cups of cauliflower can REALLY vary in weight.

Whoops.

OK, so my attempt at this recipe failed. Will I ever try it again, incorporating my new-found knowledge about cauliflower weight? Maybe, but probably not for a long time. My taste buds are still in full-on recovery mode, after which they will probably have to go to counseling.

What I learned:
-Blended cauliflower will make an excellent thickening agent in a “creamy” soup, where it won’t matter so much if any cauliflower flavor remains.
-The process of weighing cauliflower should not be overlooked. (!!!!)
-My taste buds can survive anything.

Seriously, though, I think this recipe is worth a try. I really botched it, but you, readers, can learn from my mistake and avoid making such an error! If you try this, let me know how it goes!

You CAN Have Your Cookie and Eat It, Too!

Yeah, yeah, so they say that cookies aren’t nutritious. I don’t know exacty who “they” are, but they’re wrong! At least, partially wrong.

Now, I’m not saying that ALL cookies are nutritious. There are quite a few sweets that have pretty much no nutritional value. And then there are some cookies that are misleading…like the ones that claim to be healthy and nutritious but have sugar (powdered and granulated) as two of the first three ingredients while also incorporating corn syrup and artificial flavors (yes, that description refers to an actual food product).

But then there are cookies that give us hope. Like the one that was listed in the recipe section of an e-newsletter I received (originally taken from www.skinnytaste.com. I’m not familiar with the site (yet), but based on how tasty these cookies were, I may have to check it out).

The e-newsletter calls them “three-ingredient cookies,” and on the website, they’re listed as “healthy cookies.” I’ve just started referring to them as banana-walnut-oat cookies. Still not a very catchy name. Anyone have better suggestions? The comment section is ready!

I’ve made these twice already (once just to try them out and once for Mother’s Day), and both attempts have been successful and not at all time consuming. Give them a try!

Ingredients:
2 mashed (ripe) bananas
1 cup uncooked quick oats (I use old-fashioned oats, and they work, too)
¼ cup crushed walnuts (I always use more than that, though. Walnuts are delicious!)

Three ingredients. That's it. Oh, yeah.

Three ingredients. That’s it. Oh, yeah.

First, mix the bananas and oats:

And the process begins.

And the process begins.

Then, crush the walnuts (they may be any size you like) and fold them into the banana/oat mixture:

I'm not great at the "folding" technique, so I just kind of lightly mixed the walnuts in instead.

I’m not great at the “folding” technique, so I just kind of lightly mixed the walnuts in instead.

If, like me, you then decide you want MORE walnuts, add them…

Just a few extra walnuts (prior to being crushed)

Just a few extra walnuts (prior to being crushed)

…and gaze at the finished mixture:

All mixed up!

All mixed up!

Next, plop clumps of the mixture onto a pan that has been sprayed with cooking spray. The cookies don’t really expand during the baking process, so make them whatever shape/size you want. The recipe claims to make 16 cookies, but I apparently make mine a little bigger, because I only get 12 out of the deal.

Ready to go!

Ready to go!

Pop ‘em in the oven at 350 degrees for 15 minutes.

See ya in 15 minutes!

See ya in 15 minutes!

Tap your foot impatiently for 15 minutes while waiting for the oven timer to buzz. (Or you can do crunches or push-ups or something while waiting. Your call.)

When that timer does (finally) ring, enjoy! The cookies are amazing fresh, but they’re still tasty even when they’re not right out of the oven.

Mmmmmm.

Mmmmmm.

Try it out, and let me know what you think! Mmmm, delicious.

Healthy Deliciousness: Sea Salt Caramel Bars

I spent years avoiding everything related to the kitchen (cooking included).

Then came The Great Health Kick of 2010, at which point I started discovering new, “weird” foods and realizing that I kinda sorta wanted to learn how to prepare them.

So here’s a snapshot of my culinary skills these days:
a) If you ask me to saute something, you’ll get a blank stare and an “uhm, OK” in response. Then, the moment your head turns, I’ll sneak off to find a computer to look up “saute” on Wikipedia.
b) Give me a strange, complicated recipe with previously-unheard-of ingredients and/or difficult procedures, and I’ll accept the challenge. For example: raw lasagna (pictured in its colorful, delicious glory at the top of my blog), raw apple pie, 100% whole wheat bread, raw brownies, and, the inspiration for today’s post, sea salt caramel bars.

My boss/friend, Candace, found a tasty-looking recipe for healthy post-workout sea salt caramel bars here and shared it with me (I think she secretly wanted me to do the legwork and then bring her some samples…uh, I actually mean that she knew I’d love the recipe).

So last night, my mom (who also loves healthy recipes) and I whipped up these wholesome bars.

First, we made sure we had all the ingredients:As you see: 2 tsp sea salt (aids in muscle function and contains trace minerals), 4 Tbsp chia seeds (chock full of nutrients and easy to digest), 3 cups raw cashews (protein, magnesium, B-vitamins), and 4 cups pitted Medjool dates (provides energy and, yes, is easily digestible). (Side note: Making sure dates are pitted is essential for your food processor’s sustained health.)

An optional ingredient is a dash of vanilla extract (it doesn’t add much in the way of nutrition), but we didn’t use it.

Basically, we dumped everything into the food processor:

…there go the pitted dates…

…see ya later, chia seeds…

Once all ingredients were cozily situated in the food processor, my creepy-looking hands (at least, according to the picture immediately below) started up the machine:I promise…the Wicked Witch of the West was not working the food processor. Seriously. Why do my hands look like that?!

Anyway. The instructions said to run the food processor for a minute (and to turn it off and scrape the sides of the bowl if the ingredients weren’t mixing well), but we felt it needed just a bit longer than that. After the mixture was pretty smooth, we molded it into cute little bar shapes:OK, did anyone just think, “Hey, Krista’s wearing a different shirt” and scroll back up to the beginning of this post to check? If so, you get a gold star for being observant!

Now, where was I? Oh, yes: We molded the mixture into cute little bar shapes. And we made sure we had everything in place before putting them in the oven at 200 degrees for 15 minutes (not to bake them but to remove some stickiness):
Before we put the bars in the oven, though, we checked our instructions to make sure we had everything in place for when the bars had to come out of the oven. The directions said to put the bars on parchment paper after removing them from the oven to prevent sticking.

My level of confidence drained when I realized that there was no parchment paper to be found. Yes, in my preparation, I had dutifully purchased the raw cashews and the Medjool dates (my bank account is sending me hate mail) – we already had the sea salt and the chia seeds – but I had totally overlooked the parchment paper! Ugh.

Since I’d been silently mourning the fact that I hadn’t been able to exercise much yet that day, I put on my running sneakers and ran to the grocery store. It was only a half-mile away, so I logged a mile total, but it was something. Despite the hot, muggy weather, the run was rewarding, as you can see from my flushed, glistening face:Wow, I look happy. In a cheesy, I-love-parchment-paper-so-much sort of way.

I even got back in time to remove the finished product from the oven!


As the official directions recommend, in general the bars should be stored in the freezer. But is it OK to munch on one when it is fresh from the oven? Yeah, go for it! We did:

Then we put the rest in the freezer for safe keeping. Of course, we remembered to share a bar with our little crab friend:

Our verdict: These things are delicious! In fact, I find myself trying to log intense workouts just so I have an excuse to eat them. Hehe.

So I highly recommend that you give this recipe a try. Just don’t forget the parchment paper!

Adventures in Raw Food: Raw Brownies

So I think we’ve established that I like to exercise.

Now it’s time to begin establishing that I do, on occasion, like to experiment in the kitchen, too. Keep in mind that I have had some serious kitchen disasters involving pretty simple food like frozen pizza, egg sandwiches, brownies, etc. Naturally, I figured I should see if I can be more successful with difficult recipes. Recipes that use random, obscure, expensive ingredients with names that are nearly impossible to pronounce.

Here’s the most recent deal: I had a great “to do” list for Saturday, stuff that really needed to be done. Then I got up in the morning and, thanks to my unofficial “begin the day with random internet time” tradition, I found a recipe for raw brownies here.

Given my issue with cooking anything, I’m always excited to find new raw recipes (www.goneraw.com is a great place to look, too, if you’re interested). Since the raw brownies recipe called for five ingredients, most of which I actually had in my possession, I decided to go for it!

I collected my ingredients:
2 cups whole walnuts
1 cup raw cacao
1/4 teaspoon sea salt
2 1/2 cups Medjool dates, pitted <–remember this part (Medjool dates are larger and sweeter than regular dates, making them a great natural sweetener in raw foods!)
1 cup raw, unsalted almonds (roughly chopped)

Ingredients assembled, I pulled the handy food processor out from the cupboard. I wreaked havoc on that poor cupboard, accidentally knocking over a bunch of kitchen-related devices. The clumsy start was a sign of things to come, but I was blissfully ignorant of that.

After grinding the walnuts to a pretty fine powder in the food processor, I added the sea salt and cacao:

I admit that I was a little worried about the cacao. I know it’s a superfood (chock full of all sorts of nutrients that improve physical and mental wellness), but I’d tried a tiny portion by itself, and it, uhh, wasn’t my favorite. Because it’s good for me, though, I decided I’d give it another go in the form of this brownie.

Once the walnuts, cacao, and sea salt were combined in the food processor, I moved to the next step: adding the dates one by one. Things were going along well until the food processor started running a bit rough and making a strange noise. At one point, it even shut off. I stirred the ingredients around with a spoon, and thought, “It all seems OK in there to me!”

Thankfully, the machine turned back on when I flipped the switch, and I added another date. The strange noise started again, and I frustratedly opened the lid again. This time, my search yielded a small, hard object. “Probably just a random part of the date,” I thought before throwing the offending object into the trash. “All’s well now!” (I told you I’m not great in the kitchen yet.)

I started up the food processor, and the machine started acting up again! This time, I found that one of the “small, hard objects” was wedged between the side of the food processor and the blade. I unwedged it and realized: it was the pit of one of the dates. Duh. The recipe had said to pit the dates, and I…well, I didn’t even think about it. (See…I told you I’m not great in the kitchen yet!)

I removed the rest of the pits from the mixture and pitted the remainder of the dates (the best ideas I’d had all day!):

Part of the purpose of the dates is to add moisture: not too much, but enough that the whole mixture will press together. I’d added most of the dates, and the texture seemed OK to me (although I had no idea). Still, I figured I’d just add the few remaining ones:

You know that feeling you get when you’re pretty sure you just made a huge mistake that can’t be corrected? You get light-headed, sweaty, and clammy, and your heart starts beating like a bass drum in the fastest song of the century. Yeah, well…that’s how I felt when I saw my pricey cacao, walnut, and sea salt mixture swimming in the residue of the expensive Medjool dates.

All I could think to do was try to drain the liquid. So…

Go on; laugh. I call the above contraption “improv,” and I’m not always good at it.

Sufficiently rattled, I realized I still had to chop the almonds roughly. Since this called for using a sharp knife, and since I was having a rough time of it, I knew that any slight mental error could mean an unplanned trip to the ER. So I made sure to be extra careful, and I didn’t cut myself at all! I did, however, cut a bunch of almonds:

With all ingredients prepared (albeit a bit more moist than the recipe called for), I mixed the chopped almonds with the cacao/sea salt/walnut/too-many-Medjool-dates mix and put it in a container:

Sorry about the horrendous food photography. I was too worn out to care!

The recipe suggested putting the brownies in the fridge/freezer for a while to help them set. Once they were ready (and once I was ready to put a smile back on my face), my mom and I gave them a try:

OK, so my smile looks forced. But at least it’s there!

Anyway, the brownies were delicious! I’ll definitely be making them again, once my wallet recovers from the expense. They’re totally worth it, though…and they’re healthy. Mmm. Next time: not as many dates!

Mmmmm. OK, the leftover brownies are calling my name now. Later, y’all.